Are you looking for a safe way to convert MBR to GPT using CMD without losing data? Let’s learn how to convert MBR to GPT without data loss using our 3-step CMD guide with MBR2GPT. Which walks you through validation, conversion, and switching to UEFI boot on Windows 10 and 11.
We have all faced disk limitations, partition errors, and Windows boot issues that disrupt our workflow. While most users rely on GUI tools or third-party software, few realize the power of Command Prompt (CMD) and the MBR2GPT tool to convert MBR to GPT without data loss.
Whether you are upgrading from MBR to GPT on Windows 10 or Windows 11, installing a new SSD, or optimizing your disk for modern storage standards, understanding how to convert a disk to GPT without data loss using CMD can save hours of frustration, prevent data loss, and ensure your system boots reliably in UEFI boot mode. In this guide, we’ll break down every step, explain the mbr2gpt command line, and cover troubleshooting so you can confidently convert MBR to GPT with CMD.
MBR vs GPT Explained: Why Your Windows Disk Needs CMD Conversion
Before jumping into conversion, it’s crucial to understand why MBR may be holding you back.
Master Boot Record (MBR): MBR is the traditional partition style used in legacy BIOS systems. It supports up to four primary partitions, or three primary plus an extended partition, and is limited to disks 2 TB or smaller. While reliable for older systems, MBR cannot fully leverage modern hardware.
GUID Partition Table (GPT): GPT is the modern partitioning standard compatible with UEFI boot mode. GPT supports more than four partitions, handles disks larger than 2 TB, and includes redundant partition tables for better system recovery. GPT also stores cyclic redundancy check (CRC) values, making it less prone to corruption.
We have all seen users struggle when trying to install Windows on large SSDs or NVMe drives, only to discover the installer refuses because the disk is MBR. Switching to GPT resolves this limitation and allows for a smoother, more future-proof setup.
Pro Tip: Even if your current setup works fine, moving to GPT prepares your system for future Windows updates, hardware upgrades, and UEFI-only boot modes, especially when converting MBR to GPT with mbr2gpt.exe.
Why Use CMD for MBR to GPT Conversion Instead of DiskPart?
Many guides still recommend DiskPart for disk conversion. While DiskPart is powerful, it has one major drawback: it requires deleting all existing partitions, which results in complete data loss. This is where the MBR2GPT tool shines.
- Non-Destructive Conversion: Using MBR2GPT command line converts your system disk from MBR to GPT without deleting data.
- Safe for OS Drives: Unlike DiskPart, which is risky for boot drives, MBR2GPT can safely convert system disks while keeping Windows operational.
- Command-Line Power: Running commands via CMD or PowerShell gives you full control over the process and avoids reliance on third-party tools.
We have all tried DiskPart only to lose critical data or reinstall Windows entirely. Using CMD with MBR2GPT eliminates this risk while maintaining complete control over disk management.
People also ask: “Can DiskPart convert MBR to GPT without data loss?” The answer is no—use MBR2GPT tool instead.
Prep Your PC Like a Pro: CMD Essentials Before MBR to GPT Conversion
Before starting any disk conversion, preparation is key. Many users underestimate the importance of checking prerequisites, leading to errors mid-conversion. Ensuring your system is ready not only avoids errors but also guarantees a smooth, non-destructive conversion.
- Windows Version: MBR2GPT is available on Windows 10 version 1703 or later and Windows 11, including later Windows Server editions. Older systems do not support non-destructive conversion, so make sure your OS is updated.
- Administrator Privileges: You must run CMD as an administrator; otherwise, the commands will fail. Microsoft’s Guide to Running Command Prompt as Administrator explains how to open an elevated Command Prompt safely.
- Disk Requirements:
- Maximum of 3 primary partitions
- Enough space for the EFI system partition (usually 100–260 MB)
For a detailed explanation on partition requirements, check out MBR vs GPT Disk Overview.
- Backup (Recommended): Even though MBR2GPT conversion is designed to preserve data, backing up critical files is always wise. You can use Windows Backup and Restore or any trusted cloud storage service.
- Check Boot Mode: Confirm whether your system is currently booting in BIOS settings (Legacy). GPT requires UEFI boot mode, so you’ll need to switch BIOS settings after conversion. Microsoft’s UEFI and GPT FAQ provides a complete explanation on boot modes and compatibility.
We have all ignored these preparations and ended up troubleshooting conversion failures unnecessarily. Spending a few minutes ensuring your system meets these requirements makes the conversion smooth, safe, and stress-free. These resources are invaluable for understanding disk structures, ensuring compatibility, and preparing your system before using mbr2gpt.exe commands.
3 CMD Commands to Convert MBR to GPT Without Data Loss
We have all struggled with disk conversions gone wrong. Here’s the proven CMD approach to convert MBR to GPT with CMD, broken down into three essential commands. Each command is explained with purpose, examples, warnings, and impact to make the process foolproof.
Validate Disk for Safe MBR to GPT Conversion
Command to enter in CMD:
cmdCopyEditmbr2gpt /validate /allowFullOS
How It Helps: Validation ensures your disk is eligible for safe MBR to GPT conversion. The command checks:
- Partition count (MBR2GPT works if there are ≤3 primary partitions)
- Space for the EFI system partition (usually 100–260 MB)
- OS boot configuration and boot drive layout
Real-World Example: If you have a 1 TB system disk with three primary partitions for Windows, Data, and Recovery, running /validate ensures that MBR2GPT can safely create the EFI partition without overwriting existing data.
How to Apply It:
- Open Command Prompt as Administrator (Search “CMD,” right-click, select “Run as administrator”).
- Type the command above and press Enter.
- Wait for a success message. If it fails, MBR2GPT will provide a detailed error log showing which partition or layout issue must be fixed.
Best Practices:
- Always run
/validatebefore converting. - Take note of the disk number using:
diskpart
list disk
This ensures you are validating the correct disk.
Impact:
- Confirms disk eligibility
- Prevents conversion errors
- Provides clear guidance on what needs fixing before running the conversion
Tip: If validation fails, you may need to temporarily move files or shrink partitions to meet the EFI space requirements. This avoids common errors such as “Disk layout validation failed.”
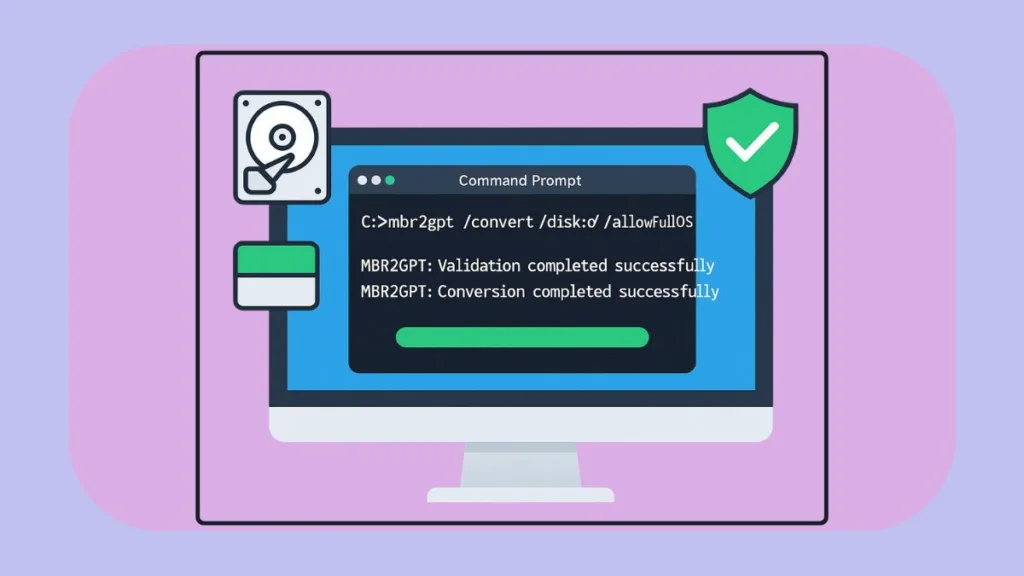
CMD Command #2: Convert MBR to GPT Without Losing Data
Command to enter in CMD:
mbr2gpt /convert /allowFullOS
How It Helps: This is the core command that converts your MBR disk to GPT without touching your data. MBR2GPT automatically:
- Creates an EFI system partition for UEFI boot
- Updates the Boot Configuration Data (BCD)
- Converts the disk structure from MBR to GPT
Real-World Example: A Windows 10 system disk with 500 GB of apps and personal files can be converted to GPT using this command, and after a reboot with UEFI enabled, the system boots normally with all data intact.
How to Apply It:
- Ensure the disk was validated successfully.
- Copy and paste the command into the elevated CMD window.
- Press Enter. Wait for confirmation:
Conversion complete successfully.
- Reboot and enter BIOS to enable UEFI boot if not already enabled.
Warnings & Best Practices:
- Do not interrupt the command while it’s running; unexpected shutdowns can corrupt the boot sector.
- Ensure you are converting the correct system disk; double-check disk numbers using Disk Management or
diskpart. - It’s always recommended to backup critical data before conversion, even though MBR2GPT is non-destructive.
Impact:
- Disk is now GPT and compatible with UEFI boot mode
- Windows continues to function normally
- No files, programs, or applications are lost
CMD Command #3: Switch to UEFI Boot for GPT Disk
Why It’s Important: After converting to GPT, Windows requires UEFI boot mode. If your system still boots in Legacy BIOS mode, the OS may fail to start. Switching to UEFI unlocks the full GPT benefits.
How to Apply It:
- Reboot your PC.
- Enter BIOS/UEFI settings (commonly pressing F2, DEL, or ESC during boot).
- Change the boot mode from Legacy BIOS to UEFI.
- Save changes and restart.
Real-World Example: After converting a 2 TB MBR disk to GPT on a gaming PC, enabling UEFI allows you to install Windows 11 and use features like secure boot, faster boot times, and multiple partition support.
Impact:
- Ensures Windows boots successfully from GPT disk
- Unlocks full GPT features: large disk support, multiple partitions, and better system recovery
- Reduces future boot or installation errors
Pro Tips:
- Check your motherboard manual for UEFI settings if options aren’t visible.
- After switching to UEFI, verify disk partitions using:
diskpart
list disk
GPT disks are marked with an asterisk (*) under the GPT column.
What to Do If CMD MBR to GPT Conversion Shows an Error
We have all encountered errors during disk conversion. CMD commands help identify and resolve common issues:
Disk Layout Validation Failed: Ensure the disk has ≤3 primary partitions and enough space for EFI.
“Windows Cannot Be Installed to This Disk”: Appears if Windows is trying to boot in BIOS mode from a GPT disk. Convert using MBR2GPT tool and enable UEFI boot mode.
BCD or Boot Issues: If boot fails, rebuild the Boot Configuration Data (BCD): cmdCopyEditbcdboot C:\Windows /s S: /f UEFI
Tip: Always validate first. Many errors are preventable with the MBR2GPT command line /validate command.
For a complete walkthrough, check out our step-by-step guide for safe MBR to GPT conversion to handle conversion errors and ensure data safety.
Level Up Your Windows Disk: Safely Convert MBR to GPT with CMD
We have all faced frustrating disk issues, boot errors, and data loss risks. By using MBR2GPT commands in CMD, you can safely convert MBR to GPT without data loss, enable UEFI boot, and modernize your system without losing data.
Remember:
- Always backup important data
- Validate your disk before conversion
- Switch to UEFI boot mode after conversion
With these steps, you gain modern disk features, larger storage support, and a stable Windows system, all without risking a single file.
Check out our latest posts on the Blog Page!